A - 稍微复杂的方法
第一、登陆SSH修改MYSQL设置
> vi /etc/my.cnf
登陆且打开MY.CNF文件,在[mysqld]中加入一行脚本 skip-grant-tables
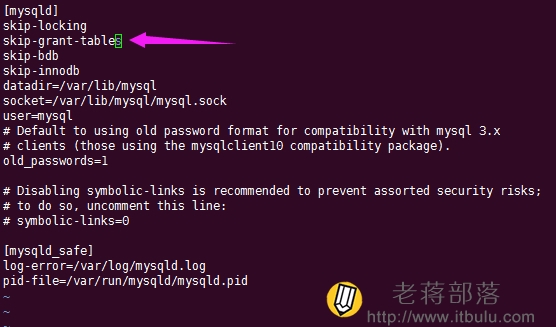
添加脚本完毕之后,保存退出。
第二、重启MYSQLD生效
> /etc/init.d/mysqld restart
第三、修改MYSQL重置密码
> /usr/bin/mysql
看下面的,整个操作过程。
> [root@localhost ~]# /usr/bin/mysql
>
> Welcome to the MySQL monitor. Commands end with ; or \g.
>
> Your MySQL connection id is 2
>
> Server version: 5.0.95 Source distribution
> Copyright (c) 2000, 2011, Oracle and/or its affiliates. All rights reserved.
> Oracle is a registered trademark of Oracle Corporation and/or its
> affiliates. Other names may be trademarks of their respective
> owners.
> Type 'help;' or '\h' for help. Type '\c' to clear the current input statement.
> mysql> USE mysql ;
> Reading table information for completion of table and column names
> You can turn off this feature to get a quicker startup with -A
> Database changed
> mysql> UPDATE user SET Password = password ( 'itbulu.com' ) WHERE User = 'root' ;
> Query OK, 3 rows affected (0.00 sec)
> Rows matched: 3 Changed: 3 Warnings: 0
> mysql> flush privileges ;
> Query OK, 0 rows affected (0.00 sec)
> mysql> quit
> Bye
红色部分是我们需要输入的,尤其是:
> UPDATE user SET Password = password ( 'itbulu.com' ) WHERE User = 'root' ;
这一行,我们应该知道什么意思了吧?就是设置ROOT用户的新密码,我们可以改成自己需要设置的。
第四、还原MY.CNF基础设置
同样的到原来第一步中/etc/my.cnf 文件,然后把skip-grant-tables添加过的去掉后保存。
第五、重启MYSQLD生效
> /etc/init.d/mysqld restart
最后,我们再重启MYSQLD设置,使得上面的设置生效。
B - 稍微简单的方法
> /etc/init.d/mysql stop
> mysqld_safe --user=mysql --skip-grant-tables --skip-networking &
> mysql -u root mysql
> mysql> UPDATE user SET Password = password ( 'itbulu.com' ) WHERE User = 'root' ;
> mysql> flush privileges;
> mysql> quit
> /etc/init.d/mysql restart
其实也就是把第一种方法简化执行,最好的方法只一行行执行上面脚本,不要直接都复制进去。以免出现错误。
就这样,我们就可以把MYSQL账户中的ROOT用户密码重置完毕,我们任选一种方法都可以实现需要的效果。